


Welcome! Float is designed to help you match the right people to the right work while keeping an eye on those all-important margins. This guide will walk you through the essential first steps.
You’ll learn how to:
- Build a complete picture of your people, so you can resource based on skills, availability, and costs
- Plan client work the right way by creating projects with the right structure
- Allocate work efficiently using hours or percentages
Whether you’re the ops lead, the resource planner, or just the one who got handed the keys, this is your go-to for making Float work from day one.
1. Set up your team
Your people are the heart of planning in Float. The first step is to build out your team so you can make smarter resourcing decisions.
📝 PS. You need to be an Admin or Account Owner to access team settings.
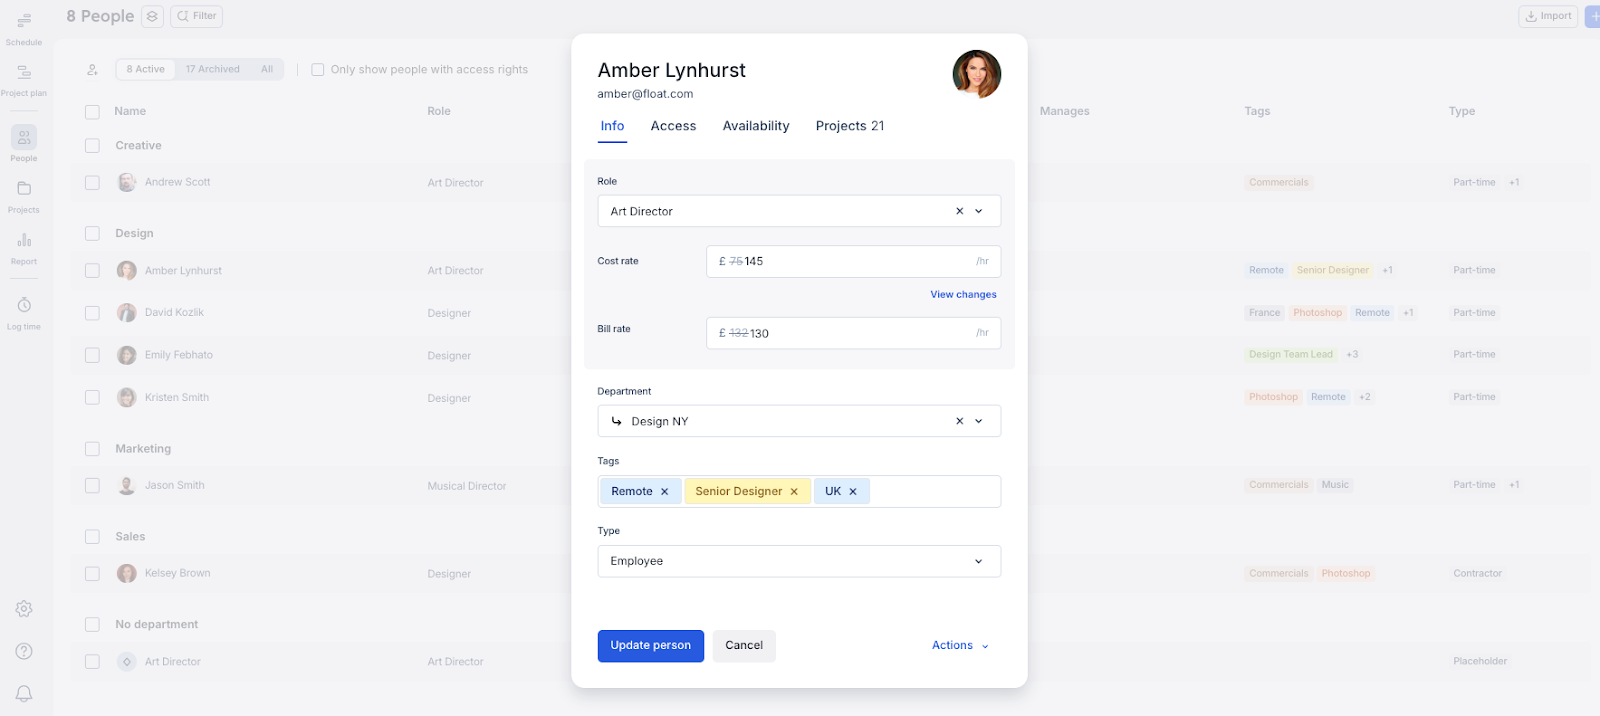
Add your team members
Head to the People tab and click Add a person.
For each person, fill in the key details that apply to your business. These may include:
- Name
- Email address
- Role
- Department
- Tags e.g., Designer, Berlin, or 3D animation
- Type e.g., employee or contractor
- Cost rate
- Bill rate
Fill out the fields you feel you need to get started. You can bulk edit the remaining fields later.
<tip>
Costs & bill rates help you protect your margins
Cost rates show how much it costs your business to employ people, while bill rates show how much you charge your clients for the team’s time. Tracking cost and bill rates lets you monitor project margins and profitability right from the start.
<tip-button>Find out more</tip-button>
</tip>
Set access levels
Before we get into the details, here’s an important thing to note: If you’re not ready for your team to log in yet, you can set your people up with names and roles. When you’re set, that’s when you’ll invite them in by adding their email and updating their access rights.
Float gives you three permission levels to choose from. Select the access level that’s right for each person based on their role in your team:
- Admin: full access to people, projects, and financials
- Manager: access to specific projects and people, and financial visibility on a case-by-case basis
- Member: access is based on personalized permissions and can manage people and projects or both. You can give them limited or full visibility of the Schedule and financial information (depending on what you choose).
Find out more in our help center guide on access rights.
Customize individual availability
Add your team’s default work hours and time off to make Float your single source of truth for capacity management.
Click on Availability to update working hours for each person on your team. You can tailor:
- Workweeks (e.g., Mondays to Thursdays only)
- Working hours (e.g., full-time, part-time, or a custom number of hours)
<tip>
Bulk edit multiple people at once
Want to make changes to your people in one go? Select multiple team members and click Edit to make updates, such as assigning them to a project or archiving their profiles.
<tip-button>Find out more</tip-button>
</tip>
Use placeholders for unassigned work
If you’re unsure who will take on a task, use Placeholders to plan ahead. These are temporary, unnamed resources with allocations that are not assigned to a specific person.
In the Type field, select Placeholder. Then customize the profile with relevant details.
For example, let’s say you’re a mid-size agency planning an e-commerce redesign for a Black Friday campaign. You know you’ll need an extra designer, but haven’t confirmed who. Add a placeholder with the role “Designer” and tags like “motion” or “3D” to keep your plans moving while resourcing catches up.
2. Build your projects
Now that your team is set up, it’s time to create your first projects in Float. Whether you’re planning a one-off job or managing multiple retainer clients, Float gives you the flexibility to structure your projects your way.
Add a new project
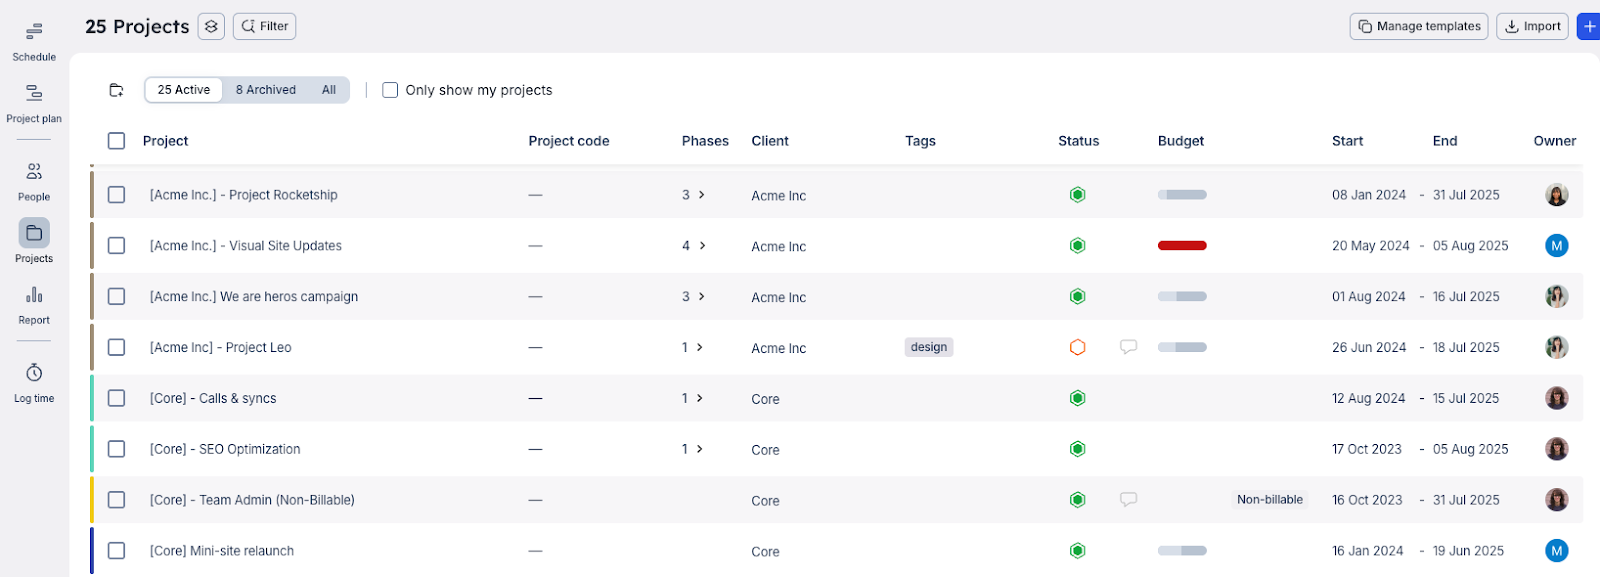
Head to the Projects tab. Click the + button in the top-right of Float and then Add project. You can either:
- Start from scratch, or
- Use a template if your project structure is similar to others you’ve run before
You can select a project status that aligns with the stage of your project. You can choose:
- Draft: not visible on the Schedule; great for early planning
- Tentative: visible on the Schedule but not confirmed
- Confirmed: fully active and ready for the team to begin work
Using these statuses helps you plan ahead without disrupting your team’s live Schedule.
Add tags for filtering and reporting
Project tags are different from people tags as they describe the work itself—like campaign type (‘Black Friday’), client industry, or strategic priority.
To create a new project tag, type the name into the Tags field within the Info section of the project side panel or select an existing tag you’ve already created from the drop-down options menu.
Later, you can use tags to filter views or pull reports—for example, to quickly see how many Black Friday campaigns you delivered this year.
Set your project budget
Float supports three main budget types—choose the one that fits how you track work and costs:
- Hours-based: set total hours by project, phase, or task
- Fee-based: set a fixed fee by project, phase, or task
- Hourly fee: track costs based on each person’s hourly rate
You can customize rates in the Team tab of a project or phase. Budgets are set in the Budget tab and can be broken down by task or phase as needed.
Create phases, milestones, and tasks
You can structure your project into phases, milestones, and tasks:
- Phases represent key stages or services (e.g., Discovery, Design, Development). Each phase has its own duration and can be assigned to specific team members.
- Tasks can live within a phase or sit at the project level. For example, you might use phases to break up a retainer into monthly sprints or add a one-off task, such as a framework meeting, that’s not tied to a specific phase.
- Milestones mark important moments in your project, like review dates or final delivery deadlines. They don’t take up any scheduled hours but help keep everyone aligned on timing.
<tip>
Speed up planning with project templates
Save any project as a template to reuse its structure, phases, and tasks—so you can kick off new work faster and keep your setup consistent. Templates also make it easier to report on repeatable workflows and spot trends across similar projects.
<tip-button>Find out more</tip-button>
</tip>
Stay across client work with the Project plan view
Once your project is set up, we suggest opening the Project plan view to drill down. This view is especially helpful if you’re using phases, as it shows:
- A visual timeline of when each phase starts and ends
- Who’s assigned to what project
- How your budget is tracking in real time
This is a powerful view when working across multiple projects. You can scan your entire pipeline or click into a single project for more context.
3. Allocate your team’s time
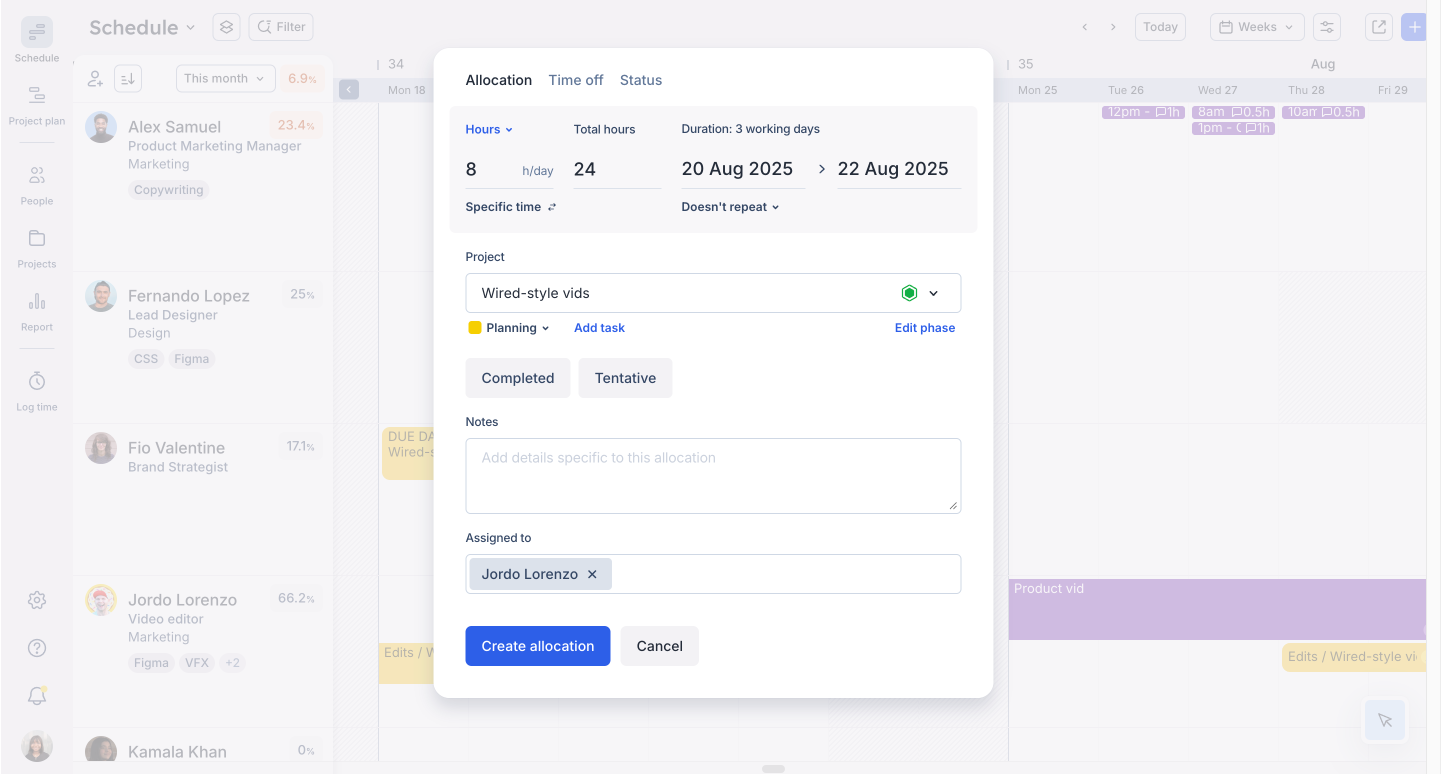
With your people and projects in place, it’s time to schedule the work. In Float, the planned assignment of someone’s time is called an allocation. Allocations let you plan work visually, adjust capacity easily, and stay on top of budgets and margins.
Each allocation includes:
- The person (or people) assigned
- The associated project, phase, or task
- The number of hours per day—or a percentage of available time
- Optional start/end times or fixed durations
You can create allocations by clicking directly on the Schedule, dragging across multiple days, or using the keyboard shortcut T. Allocations automatically use each person’s daily availability, but you can adjust hours, timing, or task details as needed.
Use Quick add to speed things up
Once you’re comfortable, Quick add makes scheduling faster:
- Select a person and drag over a date range
- Float auto-fills the task or phase and their full daily capacity
- You can tweak the hours or reassign as needed
This is ideal for blocking out large chunks of time or scheduling multiple people at once.
Prefer more control? Use manual mode
Click into any allocation block to open the details panel:
- Edit by hours or switch to percentage-based time
- Set exact start and end times
- Drag to resize or reposition work on the Schedule
Any changes you make will instantly update your project’s budget and margin indicators, so you’ll always know how your plan affects your bottom line.
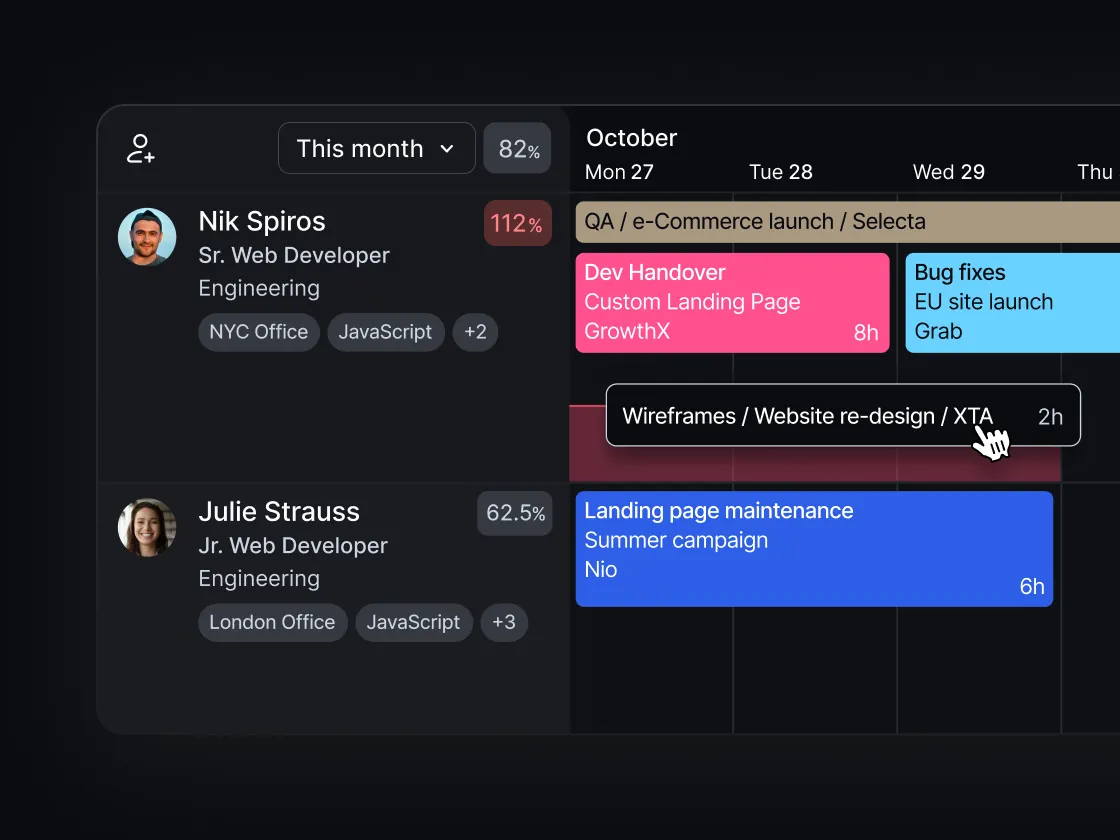
4. Get the full picture in the Schedule
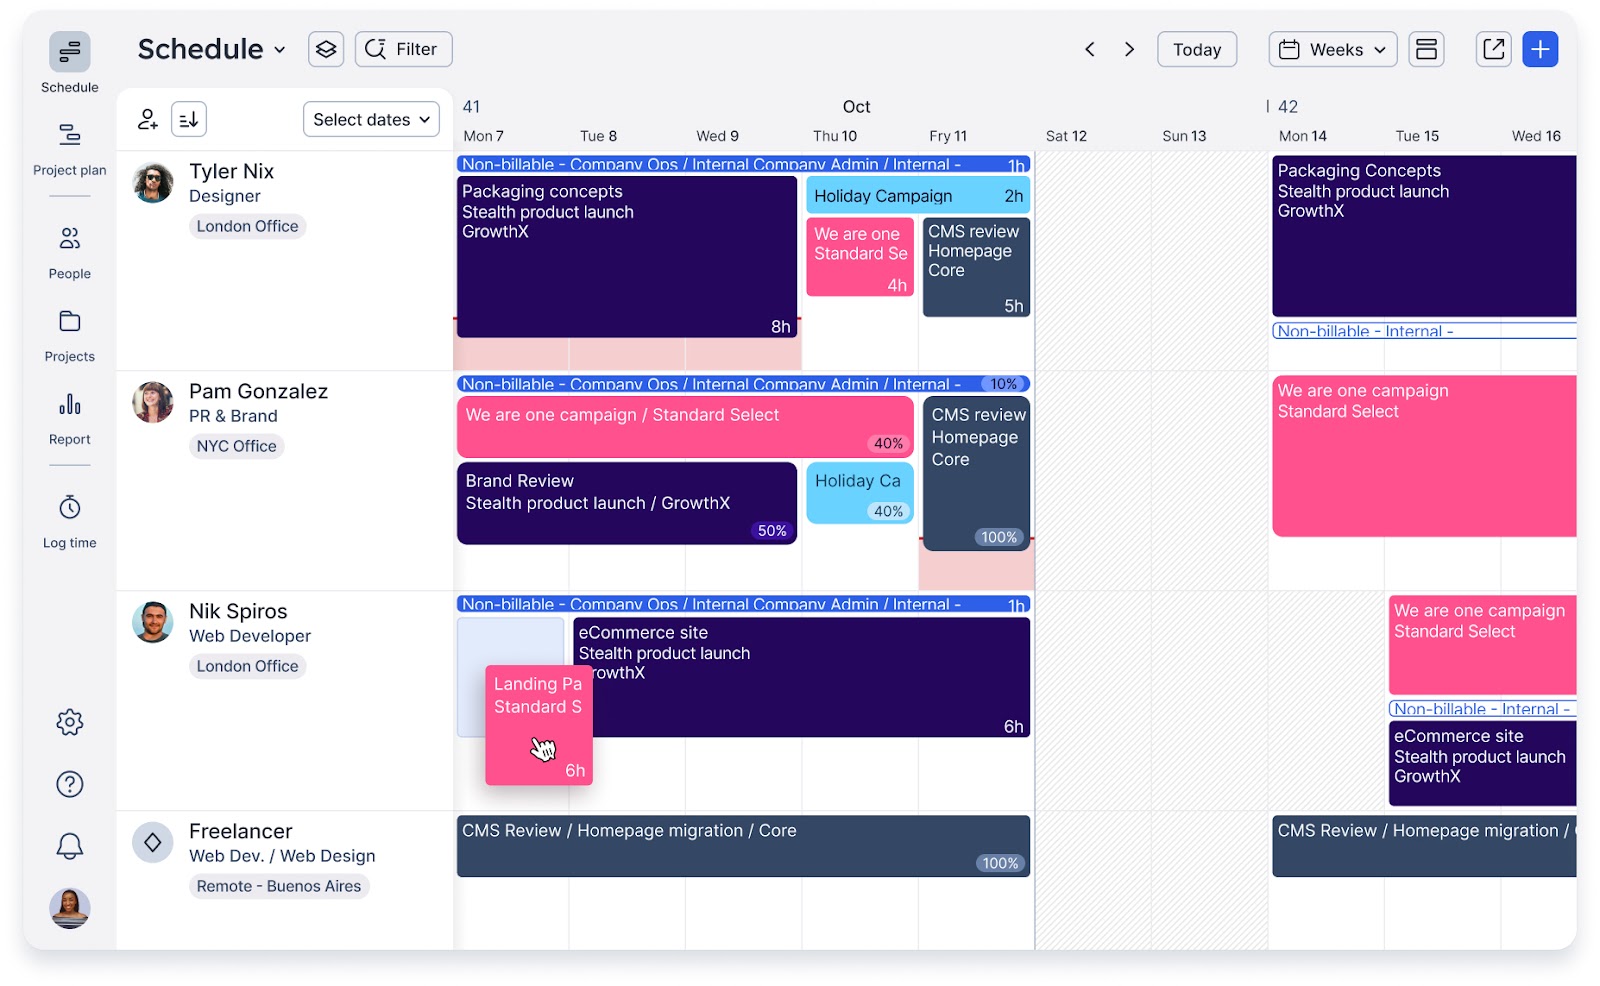
You’ve added your team, built your projects, and made your allocations—now it’s time to bring it all together. The Schedule is where Float shines. It’s your real-time command center for team planning, giving you a complete view of who’s working on what, when, and for how long.
Here’s what you’ll see in the Schedule:
- A day-by-day view of each person’s workload and availability
- Project assignments with full task and phase context
- Visual indicators for time off, public holidays, and placeholders
- Real-time utilization insights
Whether you're managing one project or many, the Schedule helps you:
- Spot scheduling gaps or overlaps at a glance
- Filter by tags like skills, departments, or location
- Save views you use often to stay organized
- Make smarter decisions based on capacity insights, not guesswork
Every allocation you create appears here—making it easy to adjust, reassign, or fine-tune as work evolves. Think of it as your live resourcing dashboard, purpose-built for clarity and control.
<tip>
Create saved views to focus on what matters most
Create custom views filtered by team, tag, department, or project—then save them for instant access later. You can also choose a default view for your team, making it easy to keep everyone aligned from the moment they log in.
<tip-button>Find out more</tip-button>
</tip>
[fs-toc-omit]You’re on the right track
By setting up your team, building projects, and assigning work in Float, you’ve laid the foundation for smarter planning and better outcomes. You now have everything you need to match the right people to the right work, keep workloads balanced, and track profitability in real time.
Whether you’re managing a single project or scaling operations across multiple teams, Float gives you the visibility and control to plan with confidence—and adapt as things shift.
If you need help along the way, our Help Center is packed with guides and how-tos, and our support team is here 24 hours a day, five days a week if you need a hand.
You’ve got this. And Float’s here to help every step of the way.
<cta-box>
<image-color="blue">
Ready to put Float to work?
You’ve got the steps: now it’s time to implement them! Log in to Float to start setting up your people, creating projects, and allocating work with confidence.
<cta-button>Get started</cta-button>
</cta-box>
FAQs
Some FAQs about getting started with Float
In Float, phases are tied directly to the project they belong to. Any team member you assign to a phase is automatically added to the overall project.
When you adjust a phase’s start or end date, all allocations on the Schedule linked to that project phase will shift with it. This keeps the Schedule for those team members in sync with the project’s timeline.
Short answer: no. In Float, you can track budgets at the project, phase, or task level—but only at one level at a time. If your budget is set at the phase level, tasks created at the project level will be treated as non-billable and won’t count toward that budget.
Go to Reports → People, then filter or click the person’s name. You’ll see all projects they’ve worked on, along with logged time, tasks, and time off.
Logged time is historical data, so set your date range to the past period you want to review.
Create tasks for each day in your project (e.g., Day 1, Day 2), then allocate time to them on the specific dates in the calendar view. By default, allocations are full-day, but you can adjust hours or assign multiple people at once.
For recurring tasks, set them to repeat weekly.
If certain days don’t involve project work—like travel or rest days—you can use these settings:
- Status: Mark the day as “Travel” or “Rest” without affecting capacity
- Time off: Add a time-off entry in Team settings to fully block the day


